a picture's worth a thousand words........and shots!
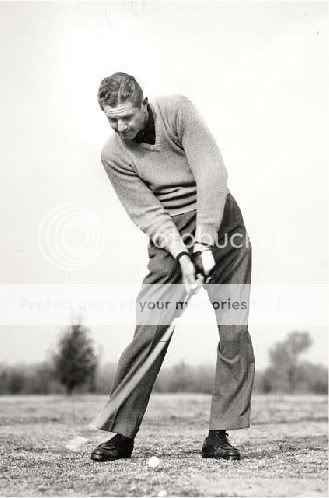
This pic of Lynn is in my humble (yet this time accurate) opinion THE best illustration.........dare i say it, of ALL TIME.....DA DA DUM DUM
centered head, weight shift, hip turn, straight left/flat left, bent right/bent right, and most importantly a "stressed" shaft via lag pressure...not just a lagging clubhead, not just "shaft lean", but a shaft that's gettin BEAT UP!!!
(To be fair I've only pulled that location off with a U.S. Kids 5-6 year old 9 iron; I can show that thing who's boss at the bottom) ...but a wonderful illustration of the "feeling"
__________________
Don't JUST "lean it", BEND IT!!
Hogan's 'plane of glass' Plane illustration is arguably the most famous illustration in golf. It is also among the most erroneous. Especially when combined with the three accompanying illustrations showing the 'baseline' shift to the right during the Downstroke.
My benchmark of "important" demands that the illustration also be correct.
Next?
If the benchmark is that the illustration also be correct wouldn't that disqualify your pic. also as it doesn't include a real event of impact as no clubshaft will be in that position in a real swing at impact. They actually deflect the exact opposite way at that moment as the clubhead goes to a lead position from a lag position.
sasho mackenzie says:
"The final phase of shaft deflection was the most
important since it explained clubhead orientation at impact.
Over the final few hundredths of a second of the downswing,
the clubhead rapidly moved from its maximum
lagging position into its maximum leading position at
impact. The lead deflections at impact for the normal
optimized simulation were approximately 6.25 cm in
magnitude. The complete removal of radial force during
the downswing only reduced lead deflection to 4.72 cm
(Fig. 8; Table 1). Therefore, when acting in isolation, the
tangential forces that occur during the late phase (after
0.15 s) of the downswing were a major contributor to the
lead deflection at impact. The complete isolation of radial
force demonstrated that, while acting alone, radial force
only resulted in 1.22 cm of lead deflection at impact
(Fig. 9; Table 1)."
the full paper can be found at his website.
UofS Theses: Understanding the role of shaft stiffness in the golf swing
If the benchmark is that the illustration also be correct wouldn't that disqualify your pic. also as it doesn't include a real event of impact as no clubshaft will be in that position in a real swing at impact. They actually deflect the exact opposite way at that moment as the clubhead goes to a lead position from a lag position.
Point taken, wedgy, but I stand by the point of the photo: the golfer should keep the ball and the head behind the hands.
Also, the stressed shafts could be taken to represent Clubhead Lag Pressure Point Pressure as felt in the #3 Pressure Point (right index finger). That is the way it feels.
Point taken, wedgy, but I stand by the point of the photo: the golfer should keep the ball and the head behind the hands.
Also, the stressed shafts could be taken to represent Clubhead Lag Pressure Point Pressure as felt in the #3 Pressure Point (right index finger). That is the way it feels.
Finally, my personal alignments are correct.
Yes i can understand that it is a good visual and feel to shoot for regardless if it( the shaft lag position at impact) happens or not. Never questioned your personal alignments as i'm more than sure they are correct for you.
very interesting photo lynn.hands and what would be the clubhead are correct,but the bend of the shaft is the other way.it's hard to imagine the shaft looking like a c but it does.makes you wander even more how we can even hit the little ball first
Some fine points that I've learned to encourage and maintain Clubhead Lag through the Impact Interval. CL has almost nothing to do with speed. Acceleration only needs to apply a greater force than the strength of the shaft and the weight of Clubhead inertia. And, Stiff shafts bend easily. Stiffer is better. Stiff shafts stay with you.
Don't create more Lag than you're prepared to Sustain (need for the length of shot)
The Right Forearm must be Driven through Release and Impact
The Right Forearm Flying Wedge must remain Intact. The Right Forearm Flying Wedge Alignment is what brings Clubhead Lag into Impact. Without the Alignment, no amount of Thrust will help. Clubhead Lag is "Keyed into" the Right Arm Flying Wedge Alignment at "Startdown".
The Right Elbow must Straighten as the RFFW approaches the Angle of Approach for Impact. It's easy to lose Clubhead Lag when the Hands Slow. If you can't maintain Hand Acceleration, then use a smaller Pulley. That's what it's there for.
The #3 Pressure Point is indispensable from start to finish. "Trace and Drag".
If you can learn to sustain Tip Bend on a fishing pole, then you can learn to sustain Clubhead Lag with a Golf Club.
If you can learn to sustain Tip Bend on a fishing pole, then you can learn to sustain Clubhead Lag with a Golf Club.[/quote]
Correct you are D. Unfortunately I am such a dummy it took me about 2 years to figure it out. And that was after about 50 years of wandering in the desert not knowing where to look for the horizon.
But now my addiction is compression. Once you find it and feel it, there is nothing like it. Those photos you posted not only look good, they feel good.
Thanks for all the illustrations and concepts you post. They are most helpful.
Some fine points that I've learned to encourage and maintain Clubhead Lag through the Impact Interval. CL has almost nothing to do with speed. Acceleration only needs to apply a greater force than the strength of the shaft and the weight of Clubhead inertia. And, Stiff shafts bend easily. Stiffer is better. Stiff shafts stay with you.
Don't create more Lag than you're prepared to Sustain (need for the length of shot)
The Right Forearm must be Driven through Release and Impact
The Right Forearm Flying Wedge must remain Intact. The Right Forearm Flying Wedge Alignment is what brings Clubhead Lag into Impact. Without the Alignment, no amount of Thrust will help. Clubhead Lag is "Keyed into" the Right Arm Flying Wedge Alignment at "Startdown".
The Right Elbow must Straighten as the RFFW approaches the Angle of Approach for Impact. It's easy to lose Clubhead Lag when the Hands Slow. If you can't maintain Hand Acceleration, then use a smaller Pulley. That's what it's there for.
The #3 Pressure Point is indispensable from start to finish. "Trace and Drag".
If you can learn to sustain Tip Bend on a fishing pole, then you can learn to sustain Clubhead Lag with a Golf Club.
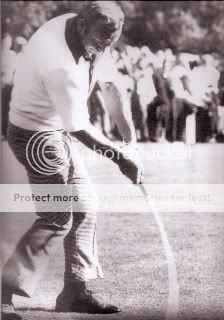
Do you have any pics at impact with the same look of lag? Some of that "look" is deceptive because of distortion, also there is in Hogan's power golf a pic that has the clubhead in the exact opposite position of leading before impact, do you think that's accurate?
The shaft leans have to be taken with a grain of salt, and that aplies to the dramtic leans/bends in either direction. Hard to get accurate depictions at that speed like a race cars tires looking out of round. Lots of delusions in this area.
What is without dispute, IMO is the principal of lag leading into the impact interval. Never been anyone worth a flat dang that didn't do that.
Mr. Kelley's mothod of achieving it may not be the only way, but is surely an effective one. But one better have it one way or another or never realize even close to full potential.
Those photos were taken with a film camera back in the day so Im not sure about the implications but with some of todays digital cameras with rolling shutters there is a distinct illusion. If on video mode some of your swings show a weird shaft bend , turn your camera upside down and film another swing to see if the shaft bends dramatically in the opposite direction. If it does your camera's rolling shutter image sensor is too slow for the shaft movement. It normally scans top down so turning it upside down will have it scanning bottom up and reverse the illusion.
If the image is super sharp , like a casio on burst mode its an accurate depiction. The shaft does bend, like a snake actually. Two ways , given toe down but I have photos that suggest three ways even after contact with the ground.


 THE best illustration.........dare i say it, of ALL TIME.....DA DA DUM DUM


 Linear Mode


